Hystrix实战
OpenFeign整合Hystrix
通常在复杂的分布式系统都存在不同服务之间的调用,OpenFeign作为Spring Cloud的远程调用工具默认是已经集成了Hystrix。在一些老的版本中,默认是打开了Hysrix,但是在新的版本中,Hystrix是关闭的,需要手动打开。
创建模块cloud-goods-service
<dependencies><dependency><groupId>org.springframework.cloud</groupId><artifactId>spring-cloud-starter-netflix-eureka-client</artifactId></dependency><dependency><groupId>org.springframework.cloud</groupId><artifactId>spring-cloud-starter-netflix-hystrix</artifactId></dependency></dependencies><build><plugins><plugin><groupId>org.springframework.boot</groupId><artifactId>spring-boot-maven-plugin</artifactId></plugin></plugins></build>
配置文件
server:port: 7777
spring:application:name: cloud-goods-service
eureka:client:serviceUrl:defaultZone: http://localhost:8761/eureka/instance:prefer-ip-address: true
控制层
@RestController
@RequestMapping("order")
public class GoodsController {private Logger log = LoggerFactory.getLogger(GoodsController.class);@GetMapping(value = "/list")public String list(@RequestParam String name) throws Exception {if (name.equals("phone")) {double random = Math.random();log.info("随机数:{}", random);if (random <= 0.9) {TimeUnit.SECONDS.sleep(60);}return "This is real request";} else {throw new Exception();}}@GetMapping(value = "/one")public String getOne() throws Exception {// 模拟请求超时TimeUnit.SECONDS.sleep(60);return "success";}
}
启动类
@SpringBootApplication
@EnableDiscoveryClient
public class GoodsApplication {public static void main(String[] args) {SpringApplication.run(GoodsApplication.class, args);}
}
cloud-order-service模块整合OpenFeign
<dependency><groupId>org.springframework.cloud</groupId><artifactId>spring-cloud-starter-openfeign</artifactId>
</dependency>
配置文件
# 新增:feign开启hystrix
feign:hystrix:enabled: true# 设置客户端的超时时间client:config:default:connectTimeout: 20000readTimeout: 20000
# 设置ribbon超时时间
ribbon:connectTimeout: 20000readTimeout: 20000
# 设置hystrix超时时间
hystrix:shareSecurityContext: truecommand:default:circuitBreaker:sleepWindowinMilliseconds: 10000forceClosed: trueexecution:isolation:thread:timeoutinMilliseconds: 10000
新增接口
@FeignClient(value = "cloud-goods-service",fallback = GoodsApiFallBack.class)
public interface GoodsApi {@GetMapping("/order/list")String list(@RequestParam String name);@GetMapping("/order/one")String getOne();
}
降级方法
@Component
public class GoodsApiFallBack implements GoodsApi {@Overridepublic String list(String name) {return "请求order->list失败!";}@Overridepublic String getOne() {return "请求order->getOne失败!";}
}
控制层
@RestController
@RequestMapping("order")
public class OrderController {@Autowiredprivate IOrderService orderService;@Autowiredprivate GoodsApi goodsApi;@GetMapping("getOrder")public String getOrder(@RequestParam String name) {return orderService.getOrder(name);}@GetMapping("/goods/list")public String listGoods(@RequestParam String name) {return goodsApi.list(name);}@GetMapping("/goods/one")public String goodsOne() {return goodsApi.getOne();}
}
启动类开启FeignClient
@SpringBootApplication
@EnableDiscoveryClient
@EnableHystrix
@EnableFeignClients
public class OrderServiceApplication {public static void main(String[] args) {SpringApplication.run(OrderServiceApplication.class, args);}
}
运行eureka server、cloud-goods-service和cloud-order-service。调用listGoods方法和goodsOne方法测试。
Hystrix DashBoard的使用
Hystrix DashBoard仪表盘是根据系统一段时间内发生的请求情况来展示的可视化面板,这些信息来自每一个HystrixCommand执行过程中的信息,这些信息是一个指标集合和具体的系统运行情况。
父级工程添加actuator
<dependency><groupId>org.springframework.boot</groupId><artifactId>spring-boot-starter-actuator</artifactId>
</dependency>
cloud-goods-service暴露Hystrix指标
添加配置,暴露hytrix的监控指标
management:endpoints:web:exposure:include: hystrix.stream
创建模块cloud-hystrix-dashboard
<dependencies><dependency><groupId>org.springframework.cloud</groupId><artifactId>spring-cloud-starter-netflix-hystrix-dashboard</artifactId></dependency> <dependency><groupId>org.springframework.cloud</groupId><artifactId>spring-cloud-starter-netflix-eureka-client</artifactId></dependency></dependencies>
配置文件
server:port: 8088
eureka:client:serviceUrl:defaultZone: http://localhost:8761/eureka/instance:prefer-ip-address: true
management:endpoints:web:exposure:include: hystrix.stream
spring:application:name: cloud-hystrix-dashboard
运行eureka server、cloud-goods-service、cloud-order-service和cloud-hystrix-dashboard。访问http://localhost:8088/hystrix,就可看到Hystrix DashBoard的首页。
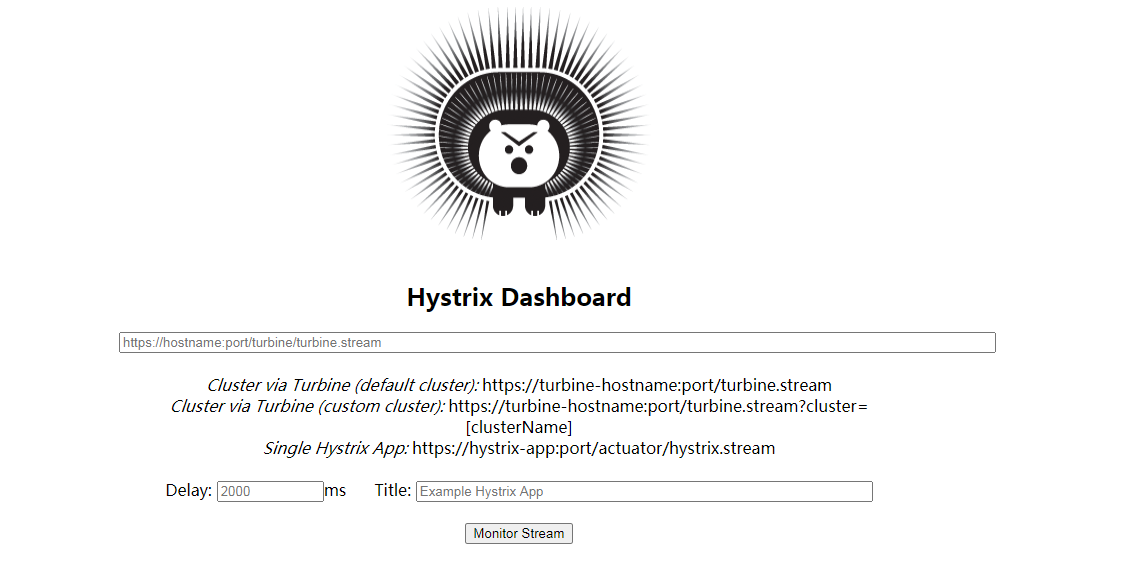
从界面上可以看到有三种监控方式:
- 默认集群监控,通过:https://turbine-hostname:port/turbine.stream
- 指定集群监控,通过:https://turbine-hostname:port/turbine.stream?cluster=[clusterName]
- 单个应用监控,通过:https://hystrix-app:port/actuator/hystrix.stream
监控单个开启了Hystrix的应用,在输入框中输入http://localhost:8888/actuator/hystrix.stream。
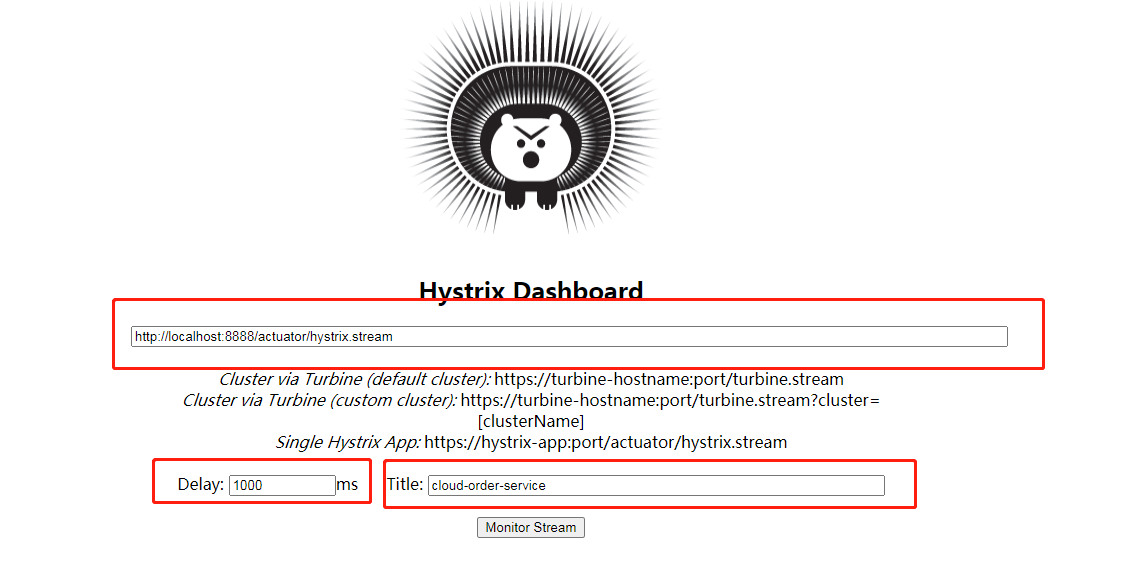
配置好之后,点击Monitor Stream,然后访问cloud-order-service的接口。
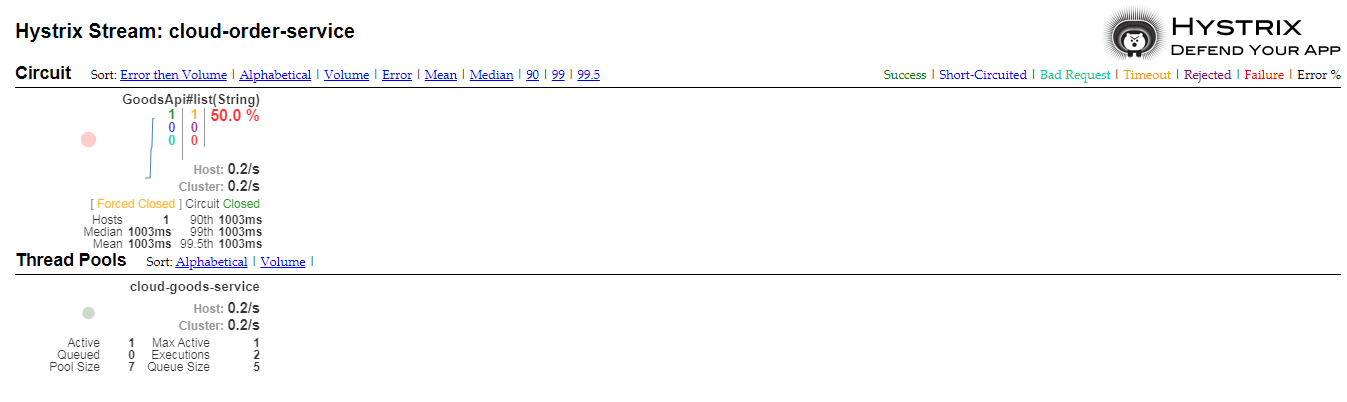
这时候关掉cloud-goods-service,连续访问接口,当失败次多达到一定程度,便会触发熔断,这是后断路器就会打开。当重新启动,并且正常提供服务,再次被调用成功时,断路器便会关闭。
关于Hystrix DashBoard的监控图:
圆圈:代表流量的大小和监控的颜色,有绿色、黄色、橙色、红色这几个颜色,通过这几个颜色的标识,可以快速发现故障、具体的实例、请求压力等。这些颜色与由上上角的Success | Short-Circuited | Bad Request | Timeout | Rejected | Failure | Error %一致。
趋势线:代表两分钟内流量的变化,可以它发现流程的浮动趋势
Host&Cluster:代表机器和集群的请求频率
Circuit:断路器的状态(open/closed)
Thread Pools:线程池的指标,核心线程池指标,队列大小,线程活跃数,线程最大活跃数,正在执行的线程数。
Turbine聚合Hystrix
上一节说道的是单个应用的监控,但是为保证系统的可用性一般每个服务都是以集群的形式存在的。
所以需要一种方式来聚合整个集群的监控状况,Turbine就是用来句很所有相关的hystrix.stream的方案,然后再Hystrix DashBoard中展示。
创建Turbine模块:cloud-turbine
<dependencies><dependency><groupId>org.springframework.cloud</groupId><artifactId>spring-cloud-starter-netflix-hystrix-dashboard</artifactId></dependency> <dependency><groupId>org.springframework.cloud</groupId><artifactId>spring-cloud-starter-netflix-hystrix</artifactId></dependency><dependency><groupId>org.springframework.cloud</groupId><artifactId>spring-cloud-starter-netflix-turbine</artifactId></dependency><dependency><groupId>org.springframework.cloud</groupId><artifactId>spring-cloud-starter-netflix-eureka-client</artifactId></dependency></dependencies><build><plugins><plugin><groupId>org.springframework.boot</groupId><artifactId>spring-boot-maven-plugin</artifactId></plugin></plugins></build>
启动类
@SpringBootApplication
@EnableDiscoveryClient
@EnableTurbine
@EnableHystrixDashboard
public class TurbineApplication {public static void main(String[] args) {SpringApplication.run(TurbineApplication.class, args);}
}
配置文件,新增配置属性,turbine.app-config设置需要手机监控信息的服务名,turbine.cluster-name-expression设置集群名称
server:port: 9088
spring:application:name: cloud-turbine-dashboard
eureka:client:serviceUrl:defaultZone: http://localhost:8761/eureka/instance:prefer-ip-address: true
management:endpoints:web:exposure:include: hystrix.stream
turbine:appConfig: cloud-order-service,cloud-goods-serviceclusterNameExpression: "'shop'"
在Goods Service中添加一个FeignClient
@FeignClient(value = "cloud-order-service",fallback = OrderApiFallBack.class)
public interface OrderApi {@GetMapping("/order/test")public String orderTest();
}
fallback
@Component
public class OrderApiFallBack implements OrderApi {@Overridepublic String orderTest() {return "请求cloud-order-service失败!";}
}
controller新增方法
@Autowired
private OrderApi orderApi;
@GetMapping("order/test")
public Object orderTest(){return orderApi.orderTest();
}
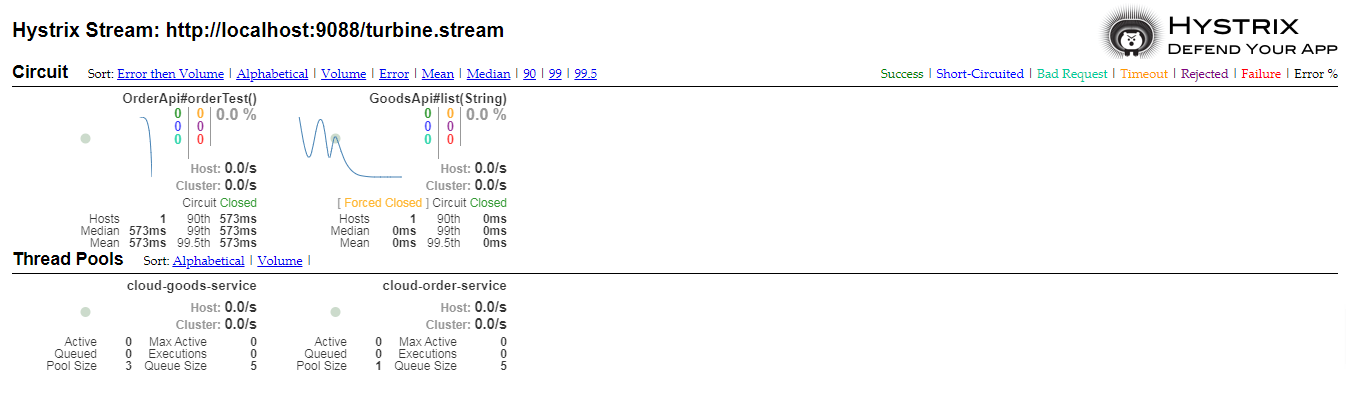
启动Eureka Server、Turbine、Order Service和Goods Service。访问http://localhost:9088/hystrix,选择集群进行监控:http://localhost:9088/turbine.stream,点击Monitor Stream。
http://localhost:8888/order/goods/list?name=hystrix
http://localhost:7777/goods/order/test
Hystrix异常机制和处理
Hystrix的异常处理中,有五种出错的情况下会被fallback所截获,从而触发fallback:
- FAILURE:执行失败,抛出异常
- TIMEOUT:执行超时
- SHORT_CIRCUITED:断路器打开
- THREAD_POOL_REJECTED:线程池拒绝
- SEMAPHORE_REJECTED:信号量拒绝
有一种类型的异常是不会触发fallback且不会被计数计入熔断的,那就是BAD_REQUEST,会抛出HystrixBadRequestException,这种异常一般对应的是由非法参数或者一些给系统异常引起的,对于这种类型的异常可以根据响应创建对应的异常进行异常封装或者直接处理。
创建一个新模块进行演示:cloud-hystrix-exception-service
<dependencies><dependency><groupId>org.springframework.cloud</groupId><artifactId>spring-cloud-starter-netflix-eureka-client</artifactId></dependency><dependency><groupId>org.springframework.cloud</groupId><artifactId>spring-cloud-starter-netflix-hystrix</artifactId></dependency><dependency><groupId>org.springframework.cloud</groupId><artifactId>spring-cloud-starter-openfeign</artifactId></dependency></dependencies><build><plugins><plugin><groupId>org.springframework.boot</groupId><artifactId>spring-boot-maven-plugin</artifactId></plugin></plugins></build>
启动类
@SpringBootApplication
@EnableDiscoveryClient
@EnableFeignClients
@EnableHystrix
public class HystrixExceptionApplication {public static void main(String[] args) {SpringApplication.run(HystrixExceptionApplication.class, args);}
}
自定义类:
用PSFallbackBadRequestException类抛出HystrixBadRequestException异常不会被fallback。
public class PSFallbackBadRequestException extends HystrixCommand<String> {protected PSFallbackBadRequestException(HystrixCommandGroupKey group) {super(HystrixCommandGroupKey.Factory.asKey("GroupBRE"));}@Overrideprotected String run() throws Exception {throw new HystrixBadRequestException("HystrixBadRequestException error");}@Overrideprotected String getFallback() {System.out.println(super.getFailedExecutionException().getMessage());return "invoke HystrixBadRequestException fallback method:  ";}
}
另外PSFallbackOtherException类抛出Exception异常,会被fallback触发。
public class PSFallbackOtherException extends HystrixCommand<String> {public PSFallbackOtherException() {super(HystrixCommandGroupKey.Factory.asKey("GroupOE"));}@Overrideprotected String run() throws Exception {throw new Exception("this command will trigger fallback");}@Overrideprotected String getFallback() {System.out.println(super.getFailedExecutionException().getMessage());return "invoke PSFallbackOtherExpcetion fallback method";}
}
public class ProviderServiceCommand extends HystrixCommand<String> {private final String name;public ProviderServiceCommand(String name) {super(HystrixCommandGroupKey.Factory.asKey("GroupSC"));this.name = name;}@Overrideprotected String run() {return "Spring Cloud";}@Overrideprotected String getFallback() {return "Failure Spring Cloud";}}
可以通过HystrixCommand的getFallback方法来获取异常
controller
@RestController
public class ExceptionController {private static Logger log = LoggerFactory.getLogger(ExceptionController.class);@GetMapping("/getProviderServiceCommand")public String providerServiceCommand(){String result = new ProviderServiceCommand("World").execute();return result;}@GetMapping("/getPSFallbackBadRequestException")public String providerServiceFallback(){String result = new PSFallbackBadRequestException().execute();return result;}@GetMapping("/getPSFallbackOtherException")public String pSFallbackOtherException(){String result = new PSFallbackOtherException().execute();return result;}@GetMapping("/getFallbackMethodTest")@HystrixCommandpublic String getFallbackMethodTest(String id){throw new RuntimeException("getFallbackMethodTest failed");}public String fallback(String id, Throwable throwable) {log.error(throwable.getMessage());return "this is fallback message";}}
配置文件
eureka:client:serviceUrl:defaultZone: http://127.0.0.1:8761/eureka/instance:prefer-ip-address: true
management:endpoints:web:exposure:include: hystrix.stream
feign:hystrix:enabled: true
访问getFallbackMethodTest:正常的fallback
访问getPSFallbackOtherExpcetion:抛出Exception,会被fallback
访问getPSFallbackBadRequestExpcetion:抛出HystrixBadRequestException,不会被fallback
访问getProviderServiceCommand:正常访问,没有异常,正常访问。
在Feign Client调用时发生HystrixBadRequestException时,可以使用ErrorDecoder实现对这类异常的包装,在实际的使用中,很多时候调用接口会抛出这些400-500之间的错误,这时候可以通过它进行封装。
@Component
public class FeignErrorDecoder implements feign.codec.ErrorDecoder{@Overridepublic Exception decode(String methodKey, Response response) {try {if (response.status() >= 400 && response.status() <= 499) {String error = Util.toString(response.body().asReader(StandardCharsets.UTF_8));return new HystrixBadRequestException(error);}} catch (IOException e) {System.out.println(e);}return feign.FeignException.errorStatus(methodKey, response);}
}
最后把该Decoder配置到Feign Client中即可,例如下面,当然也可以全局默认使用。
feign:hystrix:enabled: trueclient:config:cloud-order-service:errorDecoder: com.msr.better.hystrix.HystrixExceptionApplication
Hystrix配置说明
Hystrix的配置比较多,官方文档的地址:https://github.com/Netflix/Hystrix/wiki/Configuration。
比较常用需要改动的配置:
-
隔离策略,HystrixCommandKey,如果不配置,默认为方法名
默认值:THREAD
默认属性:hystrix.command.default.execution.isolation.strategy
实例属性:hystrix.command.HystrixCommandKey.execution.isolation.str ategy
-
配置HystrixCommand命令执行超时时间,单位毫秒
默认值:1000
默认属性:hystrix.command.default.execution.isolation.thread.timeoutinMill iseconds
实例属性:hystrix.command.HystrixCommandKey. execution.isolation.thread.timeoutinMilliseconds
-
HystrixCommand命令执行是否开启超时
默认值:true
默认属性:hystrix.command.default.execution.timeout.enabled
实例属性:hystrix.command.HystrixCommandKey.execution.timeout.enabled
-
超时时是否应中断执行操作
默认值:true
默认属性:hystrix.command.default.execution.isolation.thread.interruptOnTimeout
实例属性:hystrix.command.HystrixCommandKey.execution.isolation.thread.interruptOnTimeout
-
信号量请求数,当设置信号量隔离策略时,设置最大允许的请求数
默认值:10
默认属性:hystrix.command.default.execution.isolation.semaphore.maxConcurrentRequests
实例属性:hystrix.command.HystrixCommandKey.execution.isolation.semaphore.maxConcurrentRequests
-
Circuit Breaker设置打开fallback并启动fallback逻辑的错误比率
默认值:50
默认属性:hystrix.command.default.circuitBreaker.errorThresholdPercentage
实例属性:hystrix.command.HystrixCommandKey.circuitBreaker.errorThresholdPercentage
-
强制打开断路器,拒绝所有请求
默认值:false
默认属性:hystrix.command.default.circuitBreaker.forceOpen
实例属性:hystrix.command.HystrixCommandKey.circuitBreaker.forceOpen
-
当为线程隔离策略时,线程池核心大小
默认值:10
默认属性:hystriX.threadpool.default.coreSize
实例属性:hystriX.threadpool.HystrixThreadPoolKey.coreSize
-
当Hystrix隔离策略为线程池隔离模式时,最大线程池大小的配置,在1.5.9版本中还需要配置allowMaximumSizeToDivergeFromCoreSize为true
默认值:10
默认属性:hystrix.threadpool.default.maximumSize
实例属性:hystrix.threadpool.HystrixThreadPoolKey.maximumSize
-
allowMaximumSizeToDivergeFromCoreSize,此属性允许配置maximumSize生效
默认值:false
默认属性值:hystrix.threadpool.defalut.allowMaximumSizeToDivergeFromCoreSize
实例属性值:hystrix.threadpool.HystrixThreadPoolKey.allowMaximumSizeToDivergeFromCoreSize
-
在实际中,一般会对超时时间、线程池大小、信号量等进行修改,具体结合业务。默认的Hystrix超时时间1秒在过短,一般设置在5~10秒左右。对一些需要同步文件上传等业务则会更长,如果配置了Ribbon的超时时间,其超时时间也需要和Ribbon的时间配合使用,一般情况下Ribbon的时间应短于Hystrix的超时时间。
Hystrix线程调整和计算
对于Hystrix中线程池的大小,有些服务使用的小,有的服务使用的大,有些服务的超时时间长,有些则短。
官方也提供了一些方法计算和调整这些配置。通过自我预判的配置先发到生产或测试,然后查看具体的运行情况,在调整来服务业务。
- 超时时间默认为1秒,如果业务明显超过1秒,则根据自己的业务进行修改
- 线程池默认为10,如果确实知道要使用更多时,可以调整
- 金丝雀发布,如果成功则保持
- 在生产环境中运行超过24小时
- 如果系统有警告和监控,那么可以依靠他们捕捉问题
- 运行24小时之后,通过延迟百分比和流量来计算有意义的最低满足值
- 在生产或测试环境中实际修改值,然后再用仪表盘监控
- 如果断路器产生变化和影响,则需再次确认这个配置
官方用了一个图来标识一个典型的例子:
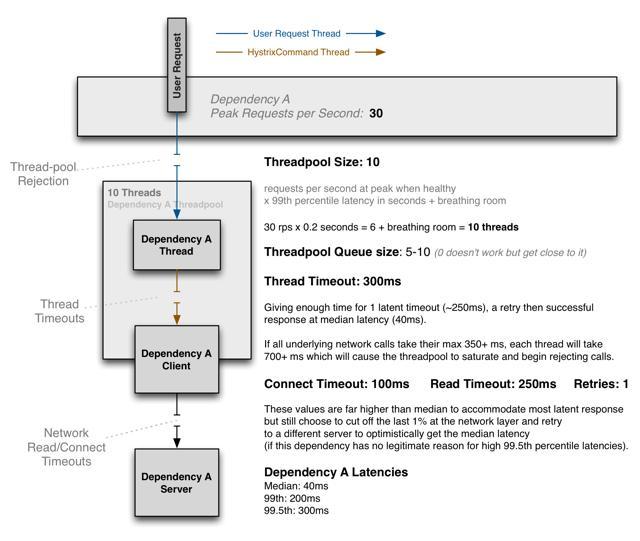
ThreadPool的大小是10,它有一个计算方法:
每秒请求的峰值 * 99% 的延迟百分比(请求的相应时间)+ 预留缓冲的值
所以这个例子为:30*0.2s=6+预留缓冲的值=10,这里预留了4个线程数。
Thread Timeout:预留了一个足够的时间,250ms,然后加上重试一次的中位数值
Connect Timeout & Read Timeout:100ms和250ms,这两个值的设置方法元高于中位数的值,以适应大多数请求。
在实际生产测试中,在配置每一个服务时可以根据官方推荐的这些方法来测试自己业务需要的数值。
Hystrix请求缓存
super(HystrixCommandGroupKey.Factory.asKey(“springCloudCacheGroup”));时Hystrix在同一个上下文请求中缓存请求结果,在进行第一次调用结束后对结果进行缓存,然后接下来同参数的请求将会使用第一次的结果,缓存的生命周期在这一次请求中有效。
使用HystrixCommand有两种方式,第一种是继承,第二种是直接注解。缓存也同时支持这两种。
1.初始化请求上下文
Hystrix的缓存在一次请求内有效,这要求在同一个Hystrix上下文里,不然在使用缓存的时候会报一个没有初始化上下文的错误,可以使用filter过滤器和Interceptor拦截器进行初始化。这里使用拦截器:
@Component
public class CacheContextInterceptor implements HandlerInterceptor {private static Logger log = LoggerFactory.getLogger(CacheContextInterceptor.class);private HystrixRequestContext context;@Overridepublic boolean preHandle(HttpServletRequest request, HttpServletResponse respone, Object arg2) throws Exception {// 请求前初始化Hystrix上下文log.info("请求前,初始化Hystrix上下文");context = HystrixRequestContext.initializeContext();return true;}@Overridepublic void postHandle(HttpServletRequest request, HttpServletResponse respone, Object arg2, ModelAndView arg3)throws Exception {}@Overridepublic void afterCompletion(HttpServletRequest request, HttpServletResponse respone, Object arg2, Exception arg3)throws Exception {// 完成之后,关闭Hystrix上下文log.info("请求完成,关闭Hystrix上下文");context.shutdown();}
}
配置类,配置拦截器
@Configuration
public class HystrixCacheConfig {@Bean@ConditionalOnClass(Controller.class)public CacheContextInterceptor userContextInterceptor() {return new CacheContextInterceptor();}@Configuration@ConditionalOnClass(Controller.class)public class WebMvcConfig implements WebMvcConfigurer {@AutowiredCacheContextInterceptor userContextInterceptor;@Overridepublic void addInterceptors(InterceptorRegistry registry) {registry.addInterceptor(userContextInterceptor);}}
}
2.使用类来开启缓存
使用类的方式很简单,只要集成HystrixCommand,然后重写它的getCacheKey方法即可以保证对于同一个请求返回同样的键值对,对于清除缓存,则调用clean方法。
public class HelloCommand extends HystrixCommand<String> {private static Logger log = LoggerFactory.getLogger(HelloCommand.class);private OrderServiceApi orderServiceApi;private String key;protected HelloCommand(OrderServiceApi orderServiceApi, String key) {super(HystrixCommandGroupKey.Factory.asKey("springCloudCacheGroup"));this.orderServiceApi = orderServiceApi;this.key = key;}public static void cleanCache(Long key) {HystrixRequestCache.getInstance(HystrixCommandKey.Factory.asKey("springCloudCacheGroup"),HystrixConcurrencyStrategyDefault.getInstance()).clear(String.valueOf(key));}@Overrideprotected String run() throws Exception {String test = orderServiceApi.test();log.info("结果:{}", test);return test;}@Overrideprotected String getCacheKey() {return String.valueOf(key);}
}
测试代码:
@RestController
public class CacheController {private static Logger log = LoggerFactory.getLogger(CacheController.class);@Autowiredprivate OrderServiceApi orderServiceApi;/*** 继承类的方式**/@GetMapping("/getCacheByClassExtendCommand")public String testCache() {HelloCommand command1 = new HelloCommand(orderServiceApi, "testCache");String res = command1.execute();log.info("controller from cache:{}", res);HelloCommand command2 = new HelloCommand(orderServiceApi, "testCache");String res2 = command2.execute();log.info("controller from cache:{}", res2);return "the second execute result is from cache " + command2.isResponseFromCache();}
}
3.使用注解开启缓存
Hystrix也提供了注解来使用缓存机制,且更加方便和快捷。使用@CacheResult和@CacheRemove即可以缓存和清除缓存。
@RestController
public class CacheController {private static Logger log = LoggerFactory.getLogger(CacheController.class);@Autowiredprivate OrderServiceApi orderServiceApi;@Autowiredprivate HelloService helloService;/*** 继承类的方式**/@GetMapping("/getCacheByClassExtendCommand")public String testCache() {HelloCommand command1 = new HelloCommand(orderServiceApi, "testCache");String res = command1.execute();log.info("controller from cache:{}", res);HelloCommand command2 = new HelloCommand(orderServiceApi, "testCache");String res2 = command2.execute();log.info("controller from cache:{}", res2);return "the second execute result is from cache " + command2.isResponseFromCache();}/*** 基于注解的缓存,id为缓存的key** @param id* @return*/@GetMapping("/query/{id}")public String query(@PathVariable("id") Integer id) {String query1 = helloService.query(id);String query2 = helloService.query(id);String query3 = helloService.query(1000);String query4 = helloService.query(1000);return query1 + "  " + query2 + "   " + query3 + "   " + query4;}/*** 更新删除缓存** @param id* @return*/@GetMapping("/update/{id}")public String update(@PathVariable("id") Integer id) {// 两次调用,第二次直接查缓存helloService.query(id);helloService.query(id);// 移除缓存helloService.update(id);// 再两次调用,重新创建缓存helloService.query(id);helloService.query(id);return "success";}
}
服务类
public interface HelloService {String query(@CacheKey Integer id);String update(@CacheKey Integer id);
}@Service
public class HelloServiceImpl implements HelloService {private Logger log = LoggerFactory.getLogger(HelloServiceImpl.class);@Autowiredprivate OrderServiceApi orderServiceApi;@CacheResult@HystrixCommand(commandKey = "query",commandProperties = {@HystrixProperty(name="requestCache.enabled",value = "true")})@Overridepublic String query(@CacheKey Integer id) {String test = orderServiceApi.test();log.info("result : {}", test);return test;}@CacheRemove(commandKey = "query")@HystrixCommand@Overridepublic String update(@CacheKey Integer id) {log.info("update delete cache");return "update";}
}
4.小结
@CacheResult 加入该注解的方法将开启请求缓存,默认情况下该方法的所有参数作为缓存的key,也就是说只有该方法的所有参数都一致时才会走缓存。
如果requestCache.enabled设置为false,即使加了@CacheResult,缓存也不起作用。
@CacheKey 通过该注解可以指定缓存的key。上面的代码用@CacheKey修饰了id字段,说明只要id相同的请求默认都会走缓存,与name字段无关,如果我们指定了@CacheResult的cacheKeyMethod属性,则@CacheKey注解无效
@CacheRemove 该注解的作用就是使缓存失效,指定了commandKey为query的的缓存失效。
在一些请求量大或者重复请求调用接口的情况下,可以利用Hystrix缓存有效地减轻请求的压力,不过要注意:
- 需要开启@EnableHystrix
- 需要初始化HystrixRequestContext
- 在指定HystrixCommand的commandKey之后,在@CacheKey也要指定commandKey。
Hystrix请求合并
Request Collapser是Hystrix退出的针对多个请求调用单个后端依赖做的一种优化和节约网络开销的方法。例如下图:
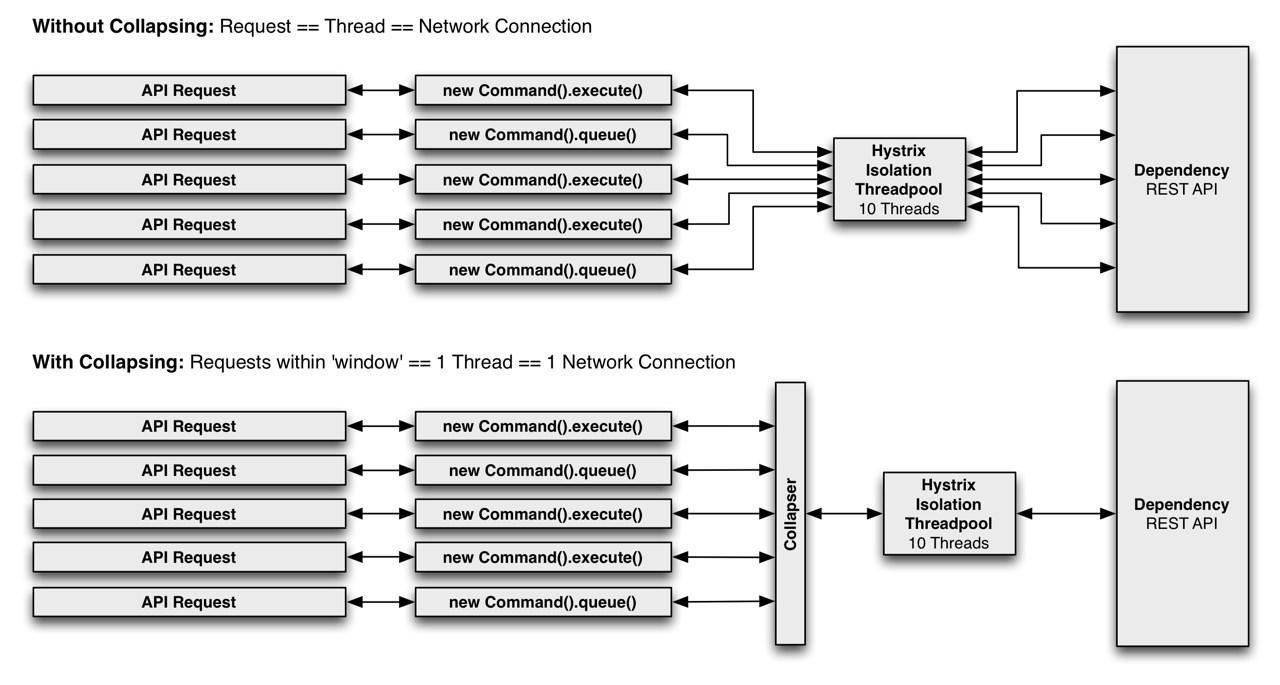
当发起5个请求时,在请求没有聚合和合并的情况下,每个请求单独开启一个线程。并开启一个网络连接进行调用,这都会加重应用程序的负担和网络开销,并占用Hystrix的线程连接池,当使用Collapser把请求合并起来时,只需要一个线程和一个连接的开销,这大大减少了并发和请求执行所需要的线程和网络连接数,尤其在一个时间段内有非常多的请求的情况下能极大地提高资源利用率。
1.使用注解进行请求合并
实现Hystrix的上下文的初始化和关闭,使用上一节的拦截器
@Component
public class CacheContextInterceptor implements HandlerInterceptor {private static Logger log = LoggerFactory.getLogger(CacheContextInterceptor.class);private HystrixRequestContext context;@Overridepublic boolean preHandle(HttpServletRequest request, HttpServletResponse respone, Object arg2) throws Exception {// 请求前初始化Hystrix上下文log.info("请求前,初始化Hystrix上下文");context = HystrixRequestContext.initializeContext();return true;}@Overridepublic void postHandle(HttpServletRequest request, HttpServletResponse respone, Object arg2, ModelAndView arg3)throws Exception {}@Overridepublic void afterCompletion(HttpServletRequest request, HttpServletResponse respone, Object arg2, Exception arg3)throws Exception {// 完成之后,关闭Hystrix上下文log.info("请求完成,关闭Hystrix上下文");context.shutdown();}
}
实现一个Future异步返回值的方法,在这个方法上配置请求合并的注解,之后外部通过调用这个方法来实现请求的合并,这个方法必须是Future异步返回值的,否则无法合并请求。定义一个合并请求的服务类:
@Service
public class CollapsingServiceImpl implements ICollapsingService {@HystrixCollapser(batchMethod = "collapsingList", collapserProperties = {@HystrixProperty(name="timerDelayInMilliseconds", value = "1000")})@Overridepublic Future<Animal> collapsing(Integer id) {return null;}@HystrixCollapser(batchMethod = "collapsingListGlobal",scope = com.netflix.hystrix.HystrixCollapser.Scope.GLOBAL, collapserProperties = {@HystrixProperty(name="timerDelayInMilliseconds", value = "10000")})@Overridepublic Future<Animal> collapsingGlobal(Integer id) {return null;}@HystrixCollapser(batchMethod = "collapsingList", collapserProperties = {@HystrixProperty(name="timerDelayInMilliseconds", value = "1000")})@Overridepublic Animal collapsingSyn(Integer id) {// TODO Auto-generated method stubreturn null;}@HystrixCommandpublic List<Animal> collapsingList(List<Integer> animalParam) {System.out.println("collapsingList当前线程" + Thread.currentThread().getName());System.out.println("当前请求参数个数:" + animalParam.size());List<Animal> animalList = new ArrayList<>();for (Integer animalNumber : animalParam) {Animal animal = new Animal();animal.setName("Cat - " + animalNumber);animal.setSex("male");animal.setAge(animalNumber);animalList.add(animal);}return animalList;}@HystrixCommandpublic List<Animal> collapsingListGlobal(List<Integer> animalParam) {System.out.println("collapsingListGlobal当前线程" + Thread.currentThread().getName());System.out.println("当前请求参数个数:" + animalParam.size());List<Animal> animalList = new ArrayList<>();for (Integer animalNumber : animalParam) {Animal animal = new Animal();animal.setName("Dog - " + animalNumber);animal.setSex("male");animal.setAge(animalNumber);animalList.add(animal);}return animalList;}
}
说明:
@HystrixCollapser注解代表开启请求合并,调用被改注解修饰的方法时,实际运行的是batchMethod值里的方法,且利用HystrixProperty指定了timerDelayInMilliseconds这属性代表合并多少ms内的请求,这里配置了1000,也就是1秒内的请求,如果不配置的话,默认是10ms。
注意:
Feign调用的话不支持Collapser。
测试的controller
@RestController
public class CollapsingController {@Autowiredprivate ICollapsingService collapsingService;/*** 请求聚合/合并* @return* @throws ExecutionException* @throws InterruptedException*/@GetMapping("/getAnimal")public String getAnimal() throws Exception {Future<Animal> a1 = collapsingService.collapsing(1);Future<Animal> a2 = collapsingService.collapsing(2);System.out.println(a1.get().getName());System.out.println(a2.get().getName());return "Success";}/*** 返回值必须是Future,否则不会进行合并/聚合* @return* @throws ExecutionException* @throws InterruptedException*/@GetMapping("/getAnimalSyn")public String getAnimalSyn() throws ExecutionException, InterruptedException {Animal a1 = collapsingService.collapsingSyn(1);Animal a2 = collapsingService.collapsingSyn(2);System.out.println(a1.getName());System.out.println(a2.getName());return "Success";}/*** 请求聚合/合并,整个应用的* @return* @throws ExecutionException* @throws InterruptedException*/@GetMapping("/getAnimalGlobal")public String getAnimalGlobal() throws Exception {Future<Animal> user = collapsingService.collapsingGlobal(1);Future<Animal> user2 = collapsingService.collapsingGlobal(2);System.out.println(user.get().getName());System.out.println(user2.get().getName());return "Success";}
}
http://localhost:5566/getAnimal
请求结果:
collapsingList当前线程hystrix-CollapsingServiceImpl-10
当前请求参数个数:2
Cat - 1
Cat - 2http://localhost:5566/getAnimalSyn
请求结果:
collapsingList当前线程hystrix-CollapsingServiceImpl-10
当前请求参数个数:1
collapsingList当前线程hystrix-CollapsingServiceImpl-10
当前请求参数个数:1
Cat - 1
Cat - 2
http://localhost:5566/getAnimal的多个请求collapsingService的方法都是在同一线程中,http://localhost:5566/getAnimalSyn的则是在两个请求并没有被合并。
上面的请求都是在同一个线程里面,如果请求collapsingService接口的请求是在不同的线程中,进行请求的合并需要配置@HystrixCollapser注解的Scope属性,配置成:com.netflix.hystrix.HystrixCollapser.Scope.GLOBAL。
Scope属性有连个值:一个是Request(默认),一个是Global。在上面的代码中已配置。
然后再改一下congtroller的getAnimalGlobal方法,新建两个线程模拟两个request去请求接口。
@GetMapping("/getAnimalGlobal")public String getAnimalGlobal() throws Exception {new Thread(()->{Future<Animal> user = collapsingService.collapsingGlobal(1);try {System.out.println(user.get().getName());} catch (InterruptedException e) {e.printStackTrace();} catch (ExecutionException e) {e.printStackTrace();}}).start();new Thread(()->{Future<Animal> user2 = collapsingService.collapsingGlobal(2);try {System.out.println(user2.get().getName());} catch (InterruptedException e) {e.printStackTrace();} catch (ExecutionException e) {e.printStackTrace();}}).start();return "Success";}
http://localhost:5566/getAnimalGlobal
请求结果:
collapsingListGlobal当前线程hystrix-CollapsingServiceImpl-1
当前请求参数个数:2
Dog - 1
Dog - 2
从结果可以看出,不同线程的请求也被合并了。
Hystrix线程传递以及并发策略
Hystrix会对请求进行封装,然后管理请求的调用,从而实现断路器等多种功能。
Hystrix提供了两种隔离模式进行请求的操作:信号量和线程隔离。
信号量:
Hystrix在请求的时候会获取到一个信号量,如果成功,则继续进行请求,请求在一个线程中执行完毕
线程隔离:
Hystrix会把请求放进线程池中执行,这时就有可能产生线程的变化,从而导致线程1的上下文数据在线程2里不能正常拿到
1.新建请求接口和本地线程持有对象
建立一个ThreadLocal来保存用户的信息,通常在微服务里,会把当前请求的上下文数据放入本地线程变量,便于使用以及销毁。
public class HystrixThreadLocal {public static ThreadLocal<String> threadLocal = new ThreadLocal<>();
}
定义controller入口:
- 请求入口打印当前线程ID,并利用上面的ThreadLocal放入用户信息
- 为兼容其他情况,在使用Feign调用的时候,通常使用RequestContextHolder拿到上下文属性
@RestController
public class ThreadContextController {private static final Logger log = LoggerFactory.getLogger(ThreadContextController.class);@Autowiredprivate IThreadContextService threadContextService;@GetMapping(value = "/getUser/{id}")public String getUser(@PathVariable("id") Integer id) {//第一种测试,放入上下文对象HystrixThreadLocal.threadLocal.set("userId : "+ id);//第二种测试,利用RequestContextHolder放入对象测试RequestContextHolder.currentRequestAttributes().setAttribute("userId", "userId : "+ id, RequestAttributes.SCOPE_REQUEST);log.info("ThreadContextController, Current thread: " + Thread.currentThread().getId());log.info("ThreadContextController, Thread local: " + HystrixThreadLocal.threadLocal.get());log.info("ThreadContextController, RequestContextHolder: " + RequestContextHolder.currentRequestAttributes().getAttribute("userId", RequestAttributes.SCOPE_REQUEST));//调用String user = threadContextService.getUser(id);return user;}
}
2.测试没有线程池隔离模式下,获取用户信息
定义一个后台服务获取之前放入的用户id,然后进行请求
public interface IThreadContextService {String getUser(Integer id);
}@Service
public class ThreadContextServiceImpl implements IThreadContextService{private static final Logger log = LoggerFactory.getLogger(ThreadContextController.class);public String getUser(Integer id) {log.info("ThreadContextService, Current thread : " + Thread.currentThread().getId());log.info("ThreadContextService, ThreadContext object : " + HystrixThreadLocal.threadLocal.get());log.info("ThreadContextService, RequestContextHolder : " + RequestContextHolder.currentRequestAttributes().getAttribute("userId", RequestAttributes.SCOPE_REQUEST).toString());return "Success";}
}
启动访问测试,结果可以看到线程id都是一样的,西安测绘给你变量也是传入的参数,请求上下文的持有对象也可以顺利拿到。
http://localhost:3333/1
日志输出结果:
ThreadContextController, Current thread: 47
ThreadContextController, Thread local: userId : 1
ThreadContextController, RequestContextHolder: userId : 1ThreadContextService, Current thread : 47
ThreadContextService, ThreadContext object : userId : 1
ThreadContextService, RequestContextHolder : userId : 1
3.测试有线程池隔离模式下,获取用户信息
在getUser方法上添加@HystrixCommand,利用Hystrix接管
@HystrixCommandpublic String getUser(Integer id) {log.info("ThreadContextService, Current thread : " + Thread.currentThread().getId());log.info("ThreadContextService, ThreadContext object : " + HystrixThreadLocal.threadLocal.get());log.info("ThreadContextService, RequestContextHolder : " + RequestContextHolder.currentRequestAttributes().getAttribute("userId", RequestAttributes.SCOPE_REQUEST).toString());return "Success";}
再次测试的结果:
ThreadContextController, Current thread: 46
ThreadContextController, Thread local: userId : 1
ThreadContextController, RequestContextHolder: userId : 1
ThreadContextService, Current thread : 74
ThreadContextService, ThreadContext object : null
线程确实变了,说明线程池隔离生效了。但是时重新启动的线程进行请求的,然后线程的变量也就丢了,RequestContextHolder中也报错了,大概的意思时没有线程变量绑定,成功地重现了父子线程数据传递的问题。
解决方法:
1、修改Hystrix的隔离策略,使用信号量,直接修改配置文件即可,但是Hystrix默认、是线程池隔离的,真实的项目中,大部分都是使用线程池隔离,所以使用信号量隔离这种方案不推荐。
hystrix.comman.default.execution.isolation.strategy
2、官方推荐使用HystrixConcurrencyStrategy。使用HystrixConcurrencyStrategy实现wrapCallable方法,对于依赖ThreadLocal状态以实现应用程序功能的系统至关重要,也就是说使用HystrixConcurrencyStrategy覆盖wrapCallable方法即可。
可以通过重写这个方法来实现想要封装线程参数的方法。
public class SpringCloudHystrixConcurrencyStrategy extends HystrixConcurrencyStrategy {private HystrixConcurrencyStrategy delegateHystrixConcurrencyStrategy;@Overridepublic <T> Callable<T> wrapCallable(Callable<T> callable) {return new HystrixThreadCallable<>(callable, RequestContextHolder.getRequestAttributes(),HystrixThreadLocal.threadLocal.get());}public SpringCloudHystrixConcurrencyStrategy() {init();}private void init() {try {this.delegateHystrixConcurrencyStrategy = HystrixPlugins.getInstance().getConcurrencyStrategy();if (this.delegateHystrixConcurrencyStrategy instanceof SpringCloudHystrixConcurrencyStrategy) {return;}HystrixCommandExecutionHook commandExecutionHook = HystrixPlugins.getInstance().getCommandExecutionHook();HystrixEventNotifier eventNotifier = HystrixPlugins.getInstance().getEventNotifier();HystrixMetricsPublisher metricsPublisher = HystrixPlugins.getInstance().getMetricsPublisher();HystrixPropertiesStrategy propertiesStrategy = HystrixPlugins.getInstance().getPropertiesStrategy();HystrixPlugins.reset();HystrixPlugins.getInstance().registerConcurrencyStrategy(this);HystrixPlugins.getInstance().registerCommandExecutionHook(commandExecutionHook);HystrixPlugins.getInstance().registerEventNotifier(eventNotifier);HystrixPlugins.getInstance().registerMetricsPublisher(metricsPublisher);HystrixPlugins.getInstance().registerPropertiesStrategy(propertiesStrategy);}catch (Exception e) {throw e;}}@Overridepublic ThreadPoolExecutor getThreadPool(HystrixThreadPoolKey threadPoolKey,HystrixProperty<Integer> corePoolSize,HystrixProperty<Integer> maximumPoolSize,HystrixProperty<Integer> keepAliveTime, TimeUnit unit,BlockingQueue<Runnable> workQueue) {return this.delegateHystrixConcurrencyStrategy.getThreadPool(threadPoolKey, corePoolSize, maximumPoolSize,keepAliveTime, unit, workQueue);}@Overridepublic ThreadPoolExecutor getThreadPool(HystrixThreadPoolKey threadPoolKey,HystrixThreadPoolProperties threadPoolProperties) {return this.delegateHystrixConcurrencyStrategy.getThreadPool(threadPoolKey, threadPoolProperties);}@Overridepublic BlockingQueue<Runnable> getBlockingQueue(int maxQueueSize) {return this.delegateHystrixConcurrencyStrategy.getBlockingQueue(maxQueueSize);}@Overridepublic <T> HystrixRequestVariable<T> getRequestVariable(HystrixRequestVariableLifecycle<T> rv) {return this.delegateHystrixConcurrencyStrategy.getRequestVariable(rv);}}
把上面重新实现的类注入到IoC中:
@Configuration
public class HystrixThreadContextConfiguration {@Beanpublic SpringCloudHystrixConcurrencyStrategy springCloudHystrixConcurrencyStrategy() {return new SpringCloudHystrixConcurrencyStrategy();}
}
5.并发策略
上面重新实现了并发策略,但是在HystrixPlugins的registerConcurrencyStrategy方法,此方法只能被调用一次,不然会报错,这导致无法与其他并发策略一起使用。
这时候就需要把其他并发策略注入进去,以达到目的。例如sleuth的并发策略也做了同样的事情,具体做法就是在构造此并发策略时,找到之前已经存在的并发策略,并保留在类的属性中,在调用的过程中,返回之前并发策略的信息,如请求变量、连接池、阻塞队列等请求进来时,既不会影响之前的并发策略,亦可以包装需要的请求信息。
Hystrix命令注解
这里主要介绍两个注解:HystrixCommand和HystrixObservableCommand。
1、HystrixCommand
主要封装执行的代码,具有故障延迟容错,断路器和统计等功能,但它是阻塞命令,也可以和Observable公用。
2、HystrixObservableCommand
和HystrixCommand差不多,主要区别是HystrixObservableCommand是一个非阻塞的调用模式。
HystrixCommand和HystrixObservableCommand都有很多共同点,如都支持故障转移和延迟容错、断路器、指标统计。两者之间也是有很多区别的:
- HystrixCommand默认世阻塞的,可以提供同步和异步两种方式,且HystrixObservableCommand是非阻塞的,默认只能是异步的
- HystrixCommand的方法是run,HystrixObservableCommand执行的construct
- HystrixCommand一个实例一次只能发送一条数据出去,HystrixObservableCommand可以发送多条。
HystrixCommand常用的属性:
- commandKey:全局唯一标识,如果不配默认是方法名
- defaultFallBack:默认的fallback方法,该函数不能有入参,返回值和方法保持一致,但fallbackMethod优先级更高
- fallbackMethod:指定处理返回逻辑的方法,必须和HystrixCommand在同一个类里,方法的参数要保持一致
- ignoreExceptions:HystrixBadRequestException不会触发fallback,这里定义的就是不希望那些异常被fallback而是直接抛出。
- cammandProperties:配置一些命名的属性,如执行的隔离策略等。
- threadPoolProperties:配置线程池相关的属性
- groupKey:全局唯一表示服务分组的名称,内部根据这个兼职来展示统计数、仪表盘等信息,默认的线程划分是根据这命令组的名称来进行的,一般会在创建HystrixCommand时指定命令组来实现默认的线程池划分
- threadPookKey:对服务的线程池信息进行配置,用于HystrixThreadPool监控、metrics、缓存等用途
最后
可以关注我的微信公众号,有更多的技术干货文章