前言
此文所使用服务的环境为:
docker 版本: v25.0.3
kubernetes版本:v1.25.0
1 安装准备
- 部署k8s集群的节点按照用途可以分为如下2类角色
- master:集群的master节点,集群的初始化节点
- slave: 集群的slave节点,可以是多台主机
- 各个节点部署的相关服务
-
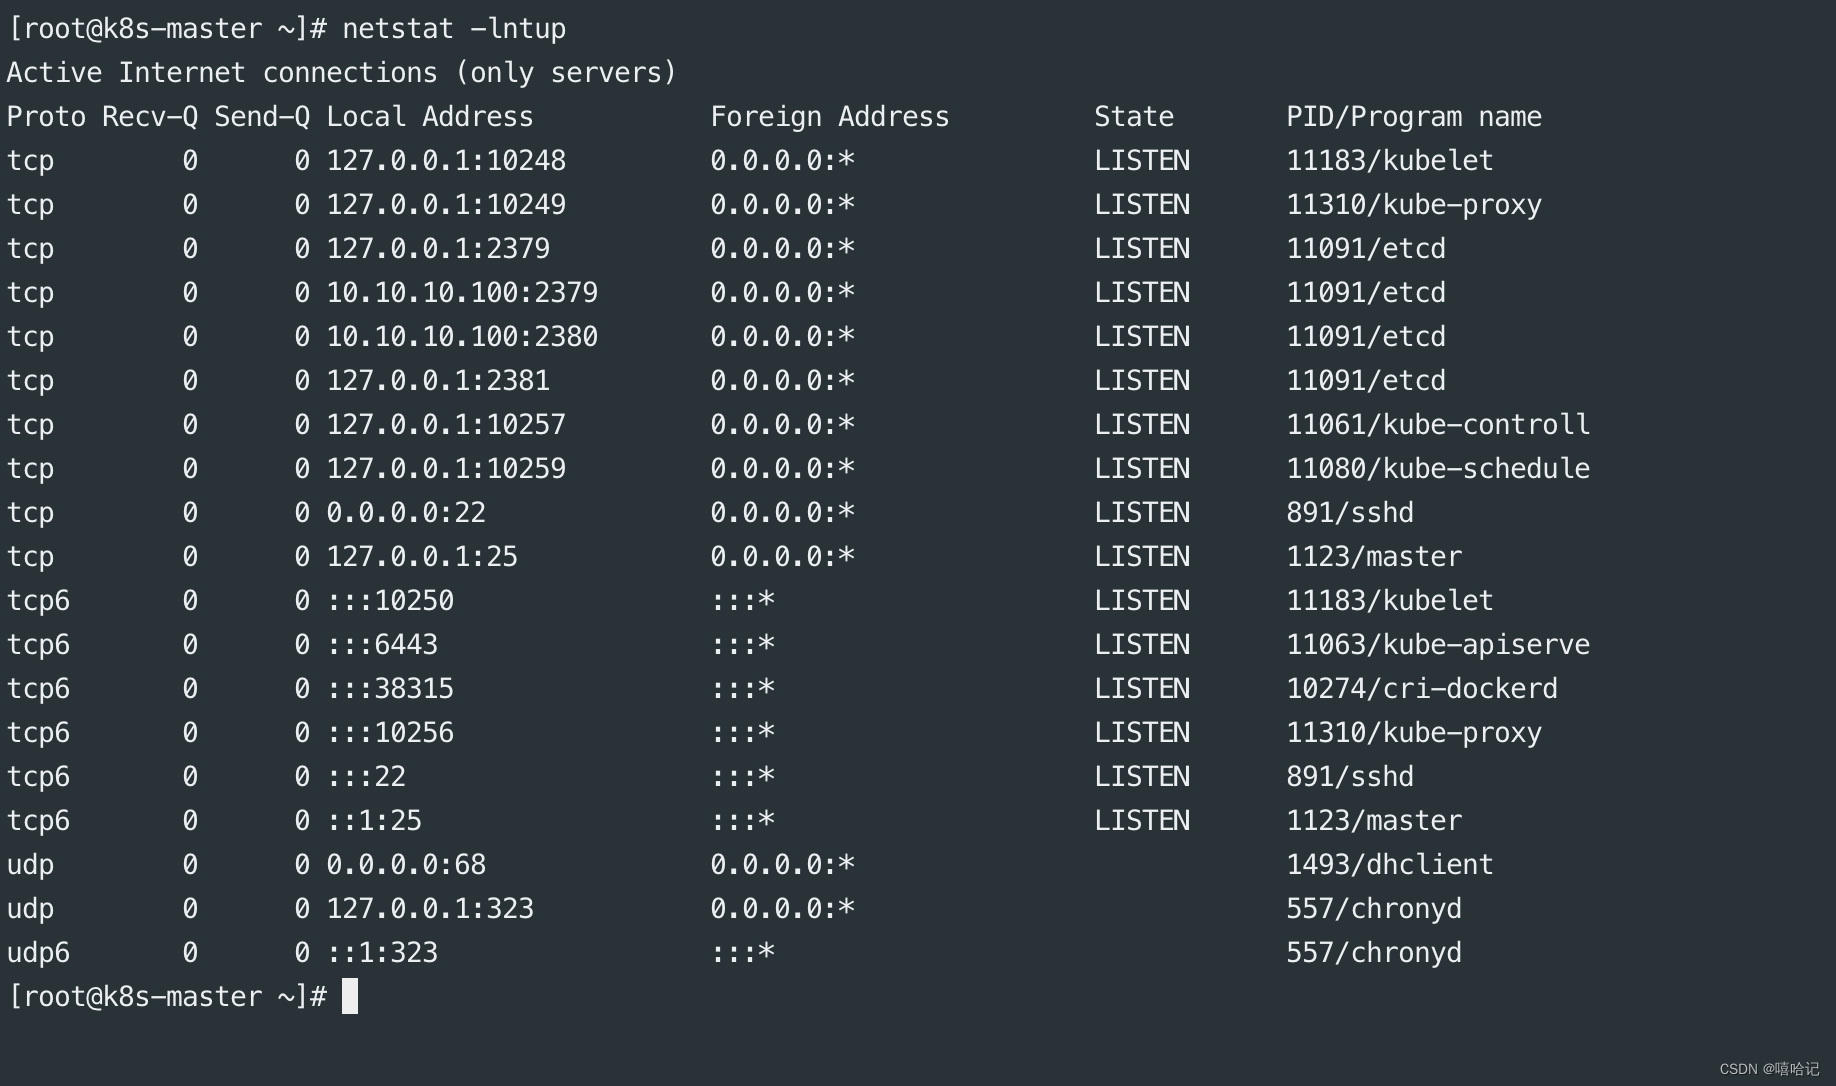
k8s-master: etcd、kube-apiserver、kube-controller-manager、kubectl、kubeadm、kubelet、flannel、docker
-
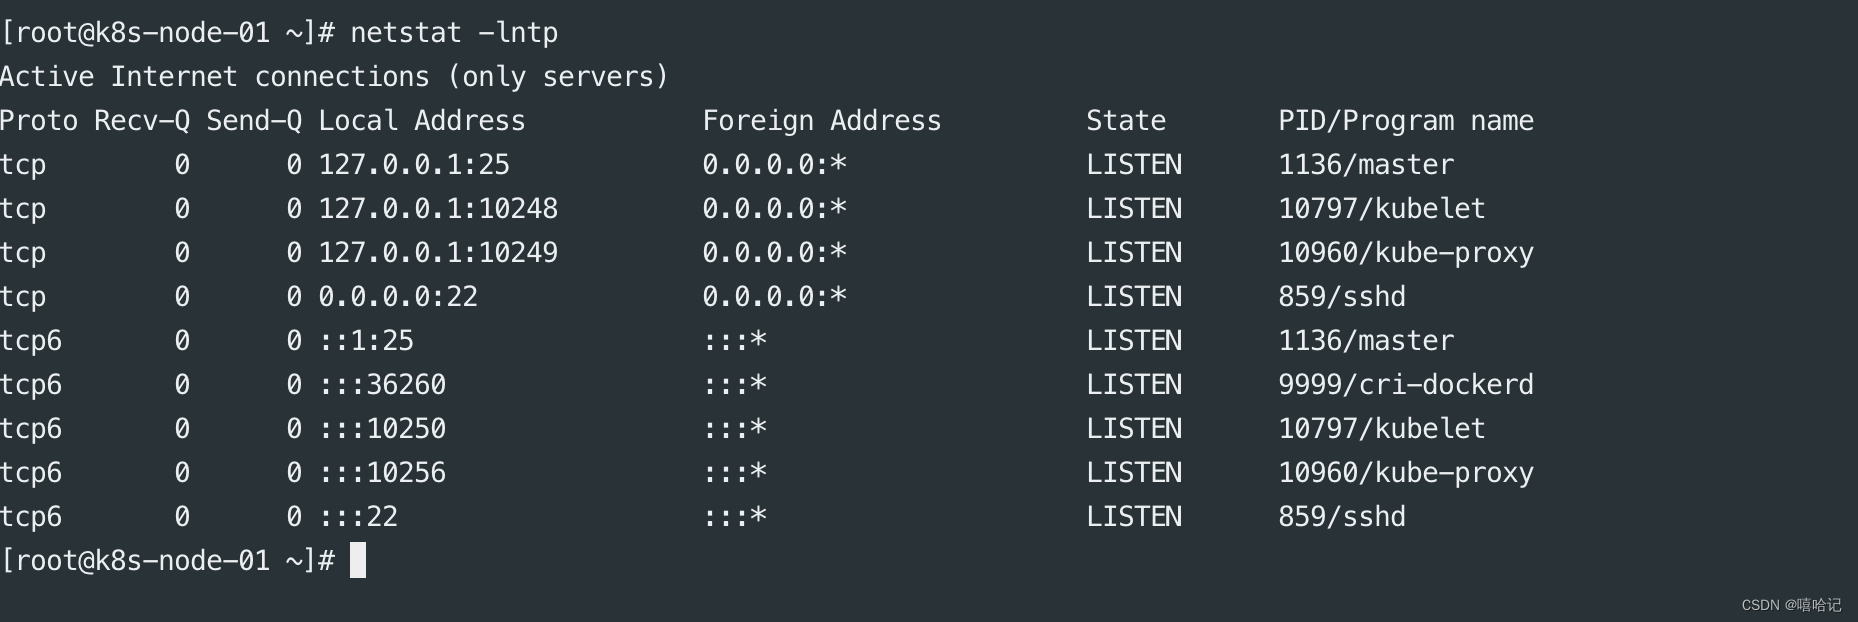
k8s-node-01: kubectl、kubelet、kube-proxy、flannel、docker
-
K8s-node-02: kubectl、kubelet、kube-proxy、flannel、docker
- 再开始部署kubernetes集群前,机器需要满足以下几个条件
- 测试环境硬件配置:2GB或者更多RAM,2个cpu或者更多,硬盘30GB或者更多
- 集群中所有机器之间网络互通
- 可以访问外网,需要拉取镜像
- 禁止使用swap分区
- 如果节点之间有安全组限制,至少要开通一下端口()
- 设置安全组放开端口
- 如果节点间无安全组限制(内网机器间可以任意访问),可以忽略,否则,至少保证如下端口可通
- k8s-master 节点: TCP 6443、2379、2380、60080、60081 UDP协议端口全部打开
- k8s-node 节点: UDP协议端口全部打开
注:这里的教程是基于非高可用版本的集群,高可用是指有多个k8s-master主节点。
2 环境准备
2.1虚拟机IP列表准备
| 角色 | IP |
|---|---|
| k8s-master | 10.10.10.100 |
| k8s-node-01 | 10.10.10.177 |
| k8s-node-02 | 10.10.10.112 |
2.2 关闭swap
swapoff -a #临时关闭swap
sed -i '/ swap / s/^\(.*)$/#\1/g' /etc/fstab  # 永久关闭swap,防止开机自动挂载swap
2.3 设置主机名
# master主机设置为master  node主机设置为node
hostnamectl set-hostname <hostname>
2.4 服务器hosts解析设置
cat >> /etc/hosts << 'EOF'
10.10.10.100  k8s-master
10.10.10.177  k8s-node-01
10.10.10.112  k8s-node-02
EOF
2.5 关闭防火墙
systemctl stop firewalld
systemctl disable firewalld# 清空防火墙规则
iptables -F
# 删除自定义链
iptables -X
# 清空防火墙数据表统计信息
iptables -Z
# 将转发(forward)数据包的默认策略设置为接受(accept)
iptables -P FORWARD  ACCEPT
2.6 关闭selinux
# 永久关闭
sed -i 's#SELINUX=enforcing#SELINUX=disable#'  /etc/selinux/config
# 临时关闭
setenforce 0
2.7 设置阿里云源
curl -o /etc/yum.repos.d/Centos-Base.repo https://mirrors.aliyun.com/repo/Centos-7.repocurl -o /etc/yum.repos.d/epel.repo http://mirrors.aliyun.com/repo/epel-7.reposed -i '/aliyuncs/d' /etc/yum.repos.d/*.repoyum clean all && yum makecache fast
2.8 确保ntp 网络正常
yum install chrony -ysystemctl start chronyd
systemctl enable chronyddate
# 如果时间不正确,修改配置文件/etc/chrony.conf,加入ntp.aliyun.com上游地址即可
ntpdate -u ntp.aliyun.com
# 将时间同步到硬件
hwclock -w
2.9 修改linux内核参数,开启数据包转发功能
# 容器跨主机通信,底层走的是iptables,内核级别的数据包转发
cat >> /etc/sysctl.d/k8s.conf << EOF
net.bridge.bridge-nf-call-ip6tables = 1
net.bridge.bridge-nf-call-iptables = 1
net.ipv4.ip_forward = 1
vm.max_map_count=262144
EOF# 加载 br_netfilter 模块到内核中,使你能够使用 Linux 桥接设备上的网络过滤功能。
modprobe  br_netfilter
# 加载读取内核参数配置文件
sysctl  -p  /etc/sysctl.d/k8s.conf
2.10 centos快速补全命令后的扩展项
yum install   bash-completion-extras -y
source /usr/share/bash-completion/bash_completion
source <(kubectl completion bash)
echo "source <(kubectl completion bash)" >> ~/.bashrc
3 kubeadm工具
kubeadm是Kubernetes主推的部署工具之一,将k8s的组件打包为了镜像,然后通过kubeadm进行集群初始化创建。所以在使用kubeadm安装k8s的时候需要先安装docker。
3.1 安装docker基础环境
yum remove docker docker-common docker-selinux docker-engine -y curl -o /etc/yum.repos.d/docker-ce.repo https://mirrors.aliyun.com/docker-ce/linux/centos/docker-ce.repoyum makecache fastyum list docker-ce --showduplicatesyum install docker-ce docker-ce-cli -y#配置docker加速器、以及crgoup驱动,改为k8s官方推荐的systemd,否则初始化时会有报错。mkdir -p /etc/dockercat > /etc/docker/daemon.json <<'EOF'
{"registry-mirrors" : ["https://ms9glx6x.mirror.aliyuncs.com"],"exec-opts":["native.cgroupdriver=systemd"]
}
EOF#启动
systemctl start docker && systemctl enable dockerdocker version
3.2 安装cri-docker
描述信息:
-
从 k8s 1.24开始,dockershim已经从kubelet中移除,但因为历史问题docker却不支持kubernetes主推的CRI(容器运行时接口)标准,所以docker不能再作为k8s的容器运行时了,即从k8s v1.24开始不再使用docker了
-
但是如果想继续使用docker的话,可以在kubelet和docker之间加上一个中间层cri-docker。cri-docker是一个支持CRI标准的shim(垫片)。一头通过CRI跟kubelet交互,另一头跟docker api交互,从而间接的实现了kubernetes以docker作为容器运行时。但是这种架构缺点也很明显,调用链更长,效率更低。
-
本文采用了cri-docker的使用,但是更推荐使用containerd作为k8s的容器运行时
官方下载:
- 开源地址 https://github.com/Mirantis/cri-dockerd
- 下载地址 https://github.com/Mirantis/cri-dockerd/releases
3.2.1 下载cri-dockerd并上传到服务器
tar -xf cri-dockerd-0.3.10.amd64.tgzcp cri-dockerd/cri-dockerd /usr/bin/chmod +x /usr/bin/cri-dockerd3.2.2 配置cri-docker启动文件
cat <<"EOF" > /usr/lib/systemd/system/cri-docker.service
[Unit]
Description=CRI Interface for Docker Application Container Engine
Documentation=https://docs.mirantis.com
After=network-online.target firewalld.service docker.service
Wants=network-online.target
Requires=cri-docker.socket
[Service]
Type=notify
ExecStart=/usr/bin/cri-dockerd --network-plugin=cni --pod-infra-container-image=registry.aliyuncs.com/google_containers/pause:3.7
ExecReload=/bin/kill -s HUP $MAINPID
TimeoutSec=0
RestartSec=2
Restart=always
StartLimitBurst=3
StartLimitInterval=60s
LimitNOFILE=infinity
LimitNPROC=infinity
LimitCORE=infinity
TasksMax=infinity
Delegate=yes
KillMode=process
[Install]
WantedBy=multi-user.target
EOF
3.2.3 ⽣成 socket ⽂件,执行如下命令
cat <<"EOF" > /usr/lib/systemd/system/cri-docker.socket
[Unit]
Description=CRI Docker Socket for the API
PartOf=cri-docker.service
[Socket]
ListenStream=%t/cri-dockerd.sock
SocketMode=0660
SocketUser=root
SocketGroup=docker
[Install]
WantedBy=sockets.target
EOF
3.2.4 启动cri-docker,并且设置开机启动
systemctl daemon-reload
systemctl enable cri-docker --now
systemctl is-active cri-docker
3.3 安装k8s
3.3.1 添加阿里云源
cat <<EOF > /etc/yum.repos.d/kubernetes.repo
[kubernetes]
name=Kubernetes
baseurl=http://mirrors.aliyun.com/kubernetes/yum/repos/kubernetes-el7-x86_64
enabled=1
gpgcheck=0
repo_gpgcheck=0
gpgkey=http://mirrors.aliyun.com/kubernetes/yum/doc/yum-key.gpghttp://mirrors.aliyun.com/kubernetes/yum/doc/rpm-package-key.gpg
EOF# 建立元数据
yum makecache  fast
3.3.2 安装k8s的初始化工具kubeadm命令
- kubelet-1.25.0 , # 组件,增删改查pod再具体机器上,pod可以运行主节点上,node节点上
- kubeadm-1.25.0 # k8s版本 1.25.0,自动拉去k8s基础组件镜像的一个工具,安装的kubeadm的版本信息,就决定了拉取k8s集群的版本镜像。
- kubectl-1.25.0 # 管理,维护k8s客户端换,和服务端交互的一个命令行工具
# 安装指定版本 kubeadm-1.25.0   ,安装的kubeadm版本,就是决定了,拉去什么版本的k8s集群版本的镜像
yum install -y kubelet-1.25.0 kubeadm-1.25.0 kubectl-1.25.0  ipvsadm# yum list kubeadm --showduplicates   列出,这个阿里云k8s源,提供了哪些k8s版本# 查看kubeadm的版本信息
[root@k8s-node-02 ~]# kubeadm version
kubeadm version: &version.Info{Major:"1", Minor:"25", GitVersion:"v1.25.0", GitCommit:"a866cbe2e5bbaa01cfd5e969aa3e033f3282a8a2", GitTreeState:"clean", BuildDate:"2022-08-23T17:43:25Z", GoVersion:"go1.19", Compiler:"gc", Platform:"linux/amd64"}
3.3.3 设置kubelet开机启动
该工具是用于建立在k8s集群中,master和node之间的联系的。
- k8s-master服务器,机器开机后,所有组件运行,etcd存储所有的pod信息通知给api-server,通知给具体目标节点
- k8s-node服务器,机器开机后,kubelet负责node节点和master节点通信,并且确认对当前机器pod状态的维护
systemctl enable kubelet docker
3.3.4 配置 cgroup-driver=systemd
cat <<EOF > /etc/sysconfig/kubelet
KUBELET_EXTRA_ARGS="--cgroup-driver=systemd"
EOF# 重新加载配置
systemctl daemon-reload# 重启docker
systemctl restart docker
3.4 初始化k8s
3.4.1 初始化k8s-master(只在主节点执行)
kubeadm init
–apiserver-advertise-address=10.10.10.100 \ # api-server运行再k8s-master的ip上
–image-repository registry.aliyuncs.com/google_containers \ # 拉取k8s镜像,从阿里云上获取,否则默认是国外的k8s镜像地址,下载不了
–kubernetes-version v1.25.0 \ # 和kubeadm保持一直
–service-cidr=10.1.0.0/16 \ # k8s服务发现网段设置,service网段
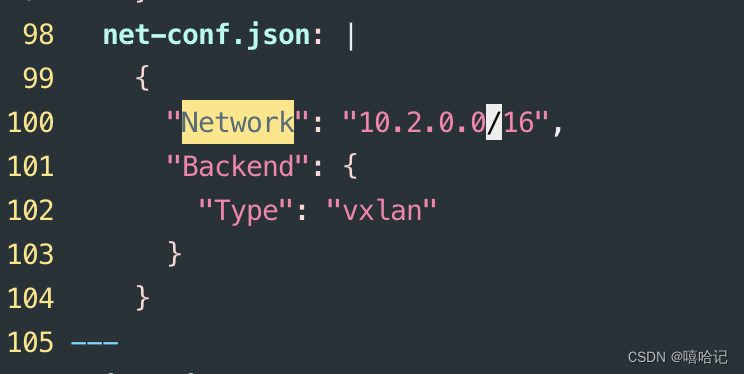
–pod-network-cidr=10.2.0.0/16 \ # 设置pod创建后,的运行网段地址
–cri-socket /var/run/cri-dockerd.sock \ 支持使用cri-docker
–service-dns-domain=cluster.local \ # k8s服务发现网段设置,service资源的域名后缀
–ignore-preflight-errors=Swap \ # 忽略swap报错
–ignore-preflight-errors=NumCPU \ # 忽略cpu数量报错
–ignore-preflight-errors=all
[root@k8s-master ~]# kubeadm init \
> --apiserver-advertise-address=10.10.10.100 \
> --image-repository registry.aliyuncs.com/google_containers \
> --kubernetes-version v1.25.0 \
> --service-cidr=10.1.0.0/16 \
> --pod-network-cidr=10.2.0.0/16 \
> --cri-socket /var/run/cri-dockerd.sock \
> --service-dns-domain=cluster.local \
> --ignore-preflight-errors=all
W0219 22:03:38.471584   10600 initconfiguration.go:119] Usage of CRI endpoints without URL scheme is deprecated and can cause kubelet errors in the future. Automatically prepending scheme "unix" to the "criSocket" with value "/var/run/cri-dockerd.sock". Please update your configuration!
[init] Using Kubernetes version: v1.25.0
[preflight] Running pre-flight checks
[preflight] Pulling images required for setting up a Kubernetes cluster
[preflight] This might take a minute or two, depending on the speed of your internet connection
[preflight] You can also perform this action in beforehand using 'kubeadm config images pull'
[certs] Using certificateDir folder "/etc/kubernetes/pki"
[certs] Generating "ca" certificate and key
[certs] Generating "apiserver" certificate and key
[certs] apiserver serving cert is signed for DNS names [k8s-master kubernetes kubernetes.default kubernetes.default.svc kubernetes.default.svc.cluster.local] and IPs [10.1.0.1 10.10.10.100]
[certs] Generating "apiserver-kubelet-client" certificate and key
[certs] Generating "front-proxy-ca" certificate and key
[certs] Generating "front-proxy-client" certificate and key
[certs] Generating "etcd/ca" certificate and key
[certs] Generating "etcd/server" certificate and key
[certs] etcd/server serving cert is signed for DNS names [k8s-master localhost] and IPs [10.10.10.100 127.0.0.1 ::1]
[certs] Generating "etcd/peer" certificate and key
[certs] etcd/peer serving cert is signed for DNS names [k8s-master localhost] and IPs [10.10.10.100 127.0.0.1 ::1]
[certs] Generating "etcd/healthcheck-client" certificate and key
[certs] Generating "apiserver-etcd-client" certificate and key
[certs] Generating "sa" key and public key
[kubeconfig] Using kubeconfig folder "/etc/kubernetes"
[kubeconfig] Writing "admin.conf" kubeconfig file
[kubeconfig] Writing "kubelet.conf" kubeconfig file
[kubeconfig] Writing "controller-manager.conf" kubeconfig file
[kubeconfig] Writing "scheduler.conf" kubeconfig file
[kubelet-start] Writing kubelet environment file with flags to file "/var/lib/kubelet/kubeadm-flags.env"
[kubelet-start] Writing kubelet configuration to file "/var/lib/kubelet/config.yaml"
[kubelet-start] Starting the kubelet
[control-plane] Using manifest folder "/etc/kubernetes/manifests"
[control-plane] Creating static Pod manifest for "kube-apiserver"
[control-plane] Creating static Pod manifest for "kube-controller-manager"
[control-plane] Creating static Pod manifest for "kube-scheduler"
[etcd] Creating static Pod manifest for local etcd in "/etc/kubernetes/manifests"
[wait-control-plane] Waiting for the kubelet to boot up the control plane as static Pods from directory "/etc/kubernetes/manifests". This can take up to 4m0s
[apiclient] All control plane components are healthy after 13.004448 seconds
[upload-config] Storing the configuration used in ConfigMap "kubeadm-config" in the "kube-system" Namespace
[kubelet] Creating a ConfigMap "kubelet-config" in namespace kube-system with the configuration for the kubelets in the cluster
[upload-certs] Skipping phase. Please see --upload-certs
[mark-control-plane] Marking the node k8s-master as control-plane by adding the labels: [node-role.kubernetes.io/control-plane node.kubernetes.io/exclude-from-external-load-balancers]
[mark-control-plane] Marking the node k8s-master as control-plane by adding the taints [node-role.kubernetes.io/control-plane:NoSchedule]
[bootstrap-token] Using token: hjdyqz.byzmutnkmn448i5z
[bootstrap-token] Configuring bootstrap tokens, cluster-info ConfigMap, RBAC Roles
[bootstrap-token] Configured RBAC rules to allow Node Bootstrap tokens to get nodes
[bootstrap-token] Configured RBAC rules to allow Node Bootstrap tokens to post CSRs in order for nodes to get long term certificate credentials
[bootstrap-token] Configured RBAC rules to allow the csrapprover controller automatically approve CSRs from a Node Bootstrap Token
[bootstrap-token] Configured RBAC rules to allow certificate rotation for all node client certificates in the cluster
[bootstrap-token] Creating the "cluster-info" ConfigMap in the "kube-public" namespace
[kubelet-finalize] Updating "/etc/kubernetes/kubelet.conf" to point to a rotatable kubelet client certificate and key
[addons] Applied essential addon: CoreDNS
[addons] Applied essential addon: kube-proxyYour Kubernetes control-plane has initialized successfully!To start using your cluster, you need to run the following as a regular user:mkdir -p $HOME/.kubesudo cp -i /etc/kubernetes/admin.conf $HOME/.kube/configsudo chown $(id -u):$(id -g) $HOME/.kube/configAlternatively, if you are the root user, you can run:export KUBECONFIG=/etc/kubernetes/admin.confYou should now deploy a pod network to the cluster.
Run "kubectl apply -f [podnetwork].yaml" with one of the options listed at:https://kubernetes.io/docs/concepts/cluster-administration/addons/Then you can join any number of worker nodes by running the following on each as root:kubeadm join 10.10.10.100:6443 --token hjdyqz.byzmutnkmn448i5z \--discovery-token-ca-cert-hash sha256:18ce7af434e99a8edd527be3ea83603e68c50fb676b7cf9eeeb169f5ded88b7f
3.4.2 创建k8s集群配置文件(主节点执行)
# 如上信息代表k8s-master集群搭建成功,需要在master节点上执行以下命令:mkdir -p $HOME/.kubesudo cp -i /etc/kubernetes/admin.conf $HOME/.kube/configsudo chown $(id -u):$(id -g) $HOME/.kube/config
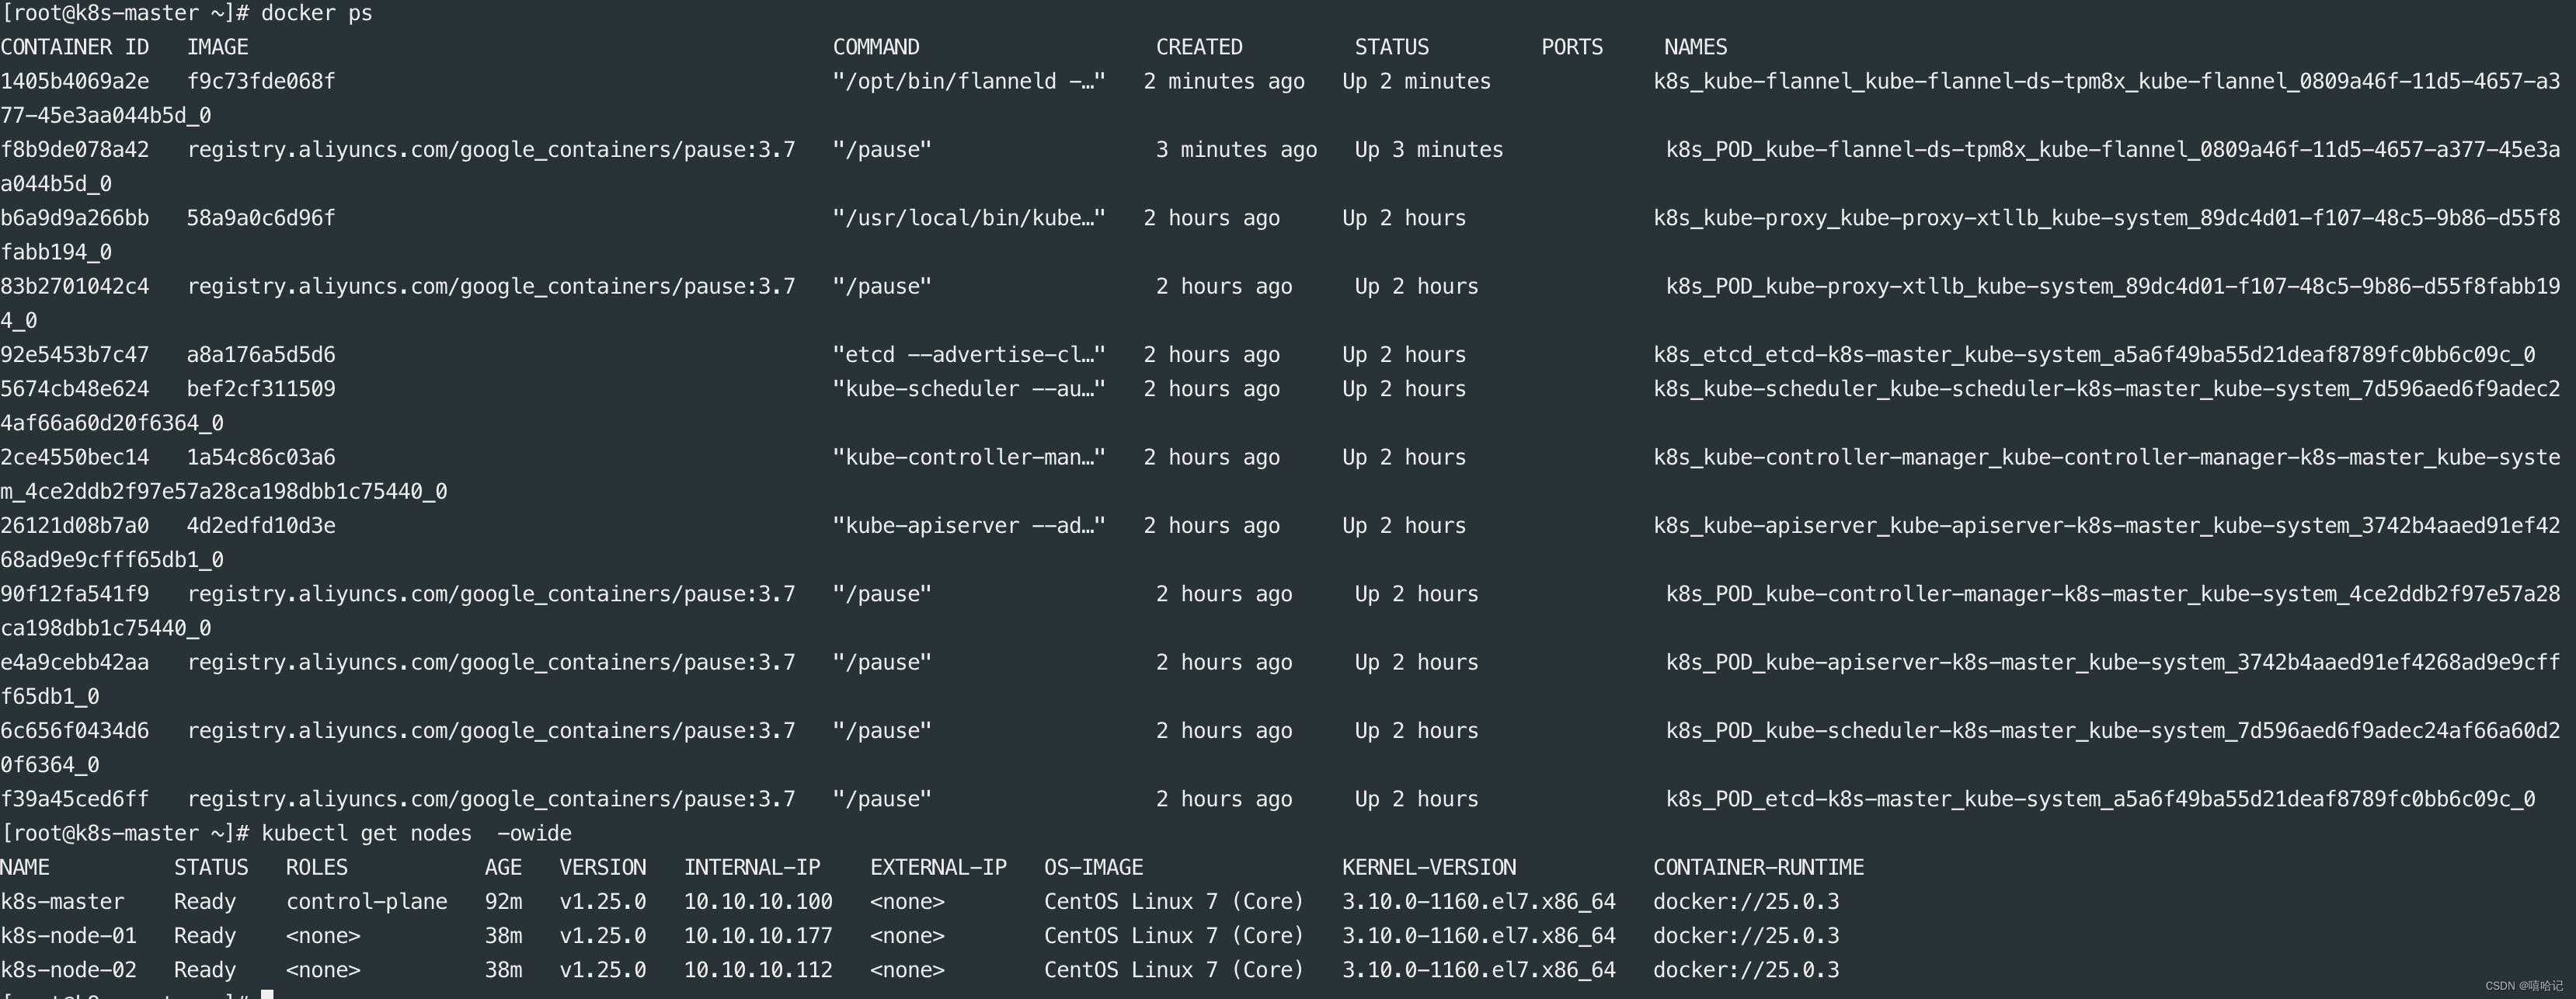
可以通过kubectl get nodes 查看node节点信息,因为node节点暂时还未加入到集群,所以只显示了一个主节点信息。

3.4.3 查看主节点上都有哪些服务信息
3.4.3 加入k8s-node节点加入到k8s-master集群中 (只在node节点执行)

由于我们使用的是k8s v1.25.0的版本,所以node节点在加入到集群的时候后面需要添加 --cri-socket /var/run/cri-dockerd.sock 这个参数,不然那会出现如上的报错信息。
[root@k8s-node-01 ~]# kubeadm join 10.10.10.100:6443 --token hjdyqz.byzmutnkmn448i5z --discovery-token-ca-cert-hash sha256:18ce7af434e99a8edd527be3ea83603e68c50fb676b7cf9eeeb169f5ded88b7f  --cri-socket /var/run/cri-dockerd.sock
W0219 22:58:28.669343   10754 initconfiguration.go:119] Usage of CRI endpoints without URL scheme is deprecated and can cause kubelet errors in the future. Automatically prepending scheme "unix" to the "criSocket" with value "/var/run/cri-dockerd.sock". Please update your configuration!
[preflight] Running pre-flight checks
[preflight] Reading configuration from the cluster...
[preflight] FYI: You can look at this config file with 'kubectl -n kube-system get cm kubeadm-config -o yaml'
[kubelet-start] Writing kubelet configuration to file "/var/lib/kubelet/config.yaml"
[kubelet-start] Writing kubelet environment file with flags to file "/var/lib/kubelet/kubeadm-flags.env"
[kubelet-start] Starting the kubelet
[kubelet-start] Waiting for the kubelet to perform the TLS Bootstrap...This node has joined the cluster:
* Certificate signing request was sent to apiserver and a response was received.
* The Kubelet was informed of the new secure connection details.Run 'kubectl get nodes' on the control-plane to see this node join the cluster.
3.4.5 查看node上都启动的那些服务
3.4.6 在master节点上查看node信息
如下图中,可以看到node的状态是未就绪状态,还缺少一个网络组件来使k8s正常工作。

3.4.7 安装一个网络插件flannel
网络插件flannel地址:https://github.com/flannel-io/flannel/blob/master/Documentation/kube-flannel.yml,
3.4.7.1 flannel.yml源文件如下
---
kind: Namespace
apiVersion: v1
metadata:name: kube-flannellabels:k8s-app: flannelpod-security.kubernetes.io/enforce: privileged
---
kind: ClusterRole
apiVersion: rbac.authorization.k8s.io/v1
metadata:labels:k8s-app: flannelname: flannel
rules:
- apiGroups:- ""resources:- podsverbs:- get
- apiGroups:- ""resources:- nodesverbs:- get- list- watch
- apiGroups:- ""resources:- nodes/statusverbs:- patch
- apiGroups:- networking.k8s.ioresources:- clustercidrsverbs:- list- watch
---
kind: ClusterRoleBinding
apiVersion: rbac.authorization.k8s.io/v1
metadata:labels:k8s-app: flannelname: flannel
roleRef:apiGroup: rbac.authorization.k8s.iokind: ClusterRolename: flannel
subjects:
- kind: ServiceAccountname: flannelnamespace: kube-flannel
---
apiVersion: v1
kind: ServiceAccount
metadata:labels:k8s-app: flannelname: flannelnamespace: kube-flannel
---
kind: ConfigMap
apiVersion: v1
metadata:name: kube-flannel-cfgnamespace: kube-flannellabels:tier: nodek8s-app: flannelapp: flannel
data:cni-conf.json: |{"name": "cbr0","cniVersion": "0.3.1","plugins": [{"type": "flannel","delegate": {"hairpinMode": true,"isDefaultGateway": true}},{"type": "portmap","capabilities": {"portMappings": true}}]}net-conf.json: |{"Network": "10.244.0.0/16","Backend": {"Type": "vxlan"}}
---
apiVersion: apps/v1
kind: DaemonSet
metadata:name: kube-flannel-dsnamespace: kube-flannellabels:tier: nodeapp: flannelk8s-app: flannel
spec:selector:matchLabels:app: flanneltemplate:metadata:labels:tier: nodeapp: flannelspec:affinity:nodeAffinity:requiredDuringSchedulingIgnoredDuringExecution:nodeSelectorTerms:- matchExpressions:- key: kubernetes.io/osoperator: Invalues:- linuxhostNetwork: truepriorityClassName: system-node-criticaltolerations:- operator: Existseffect: NoScheduleserviceAccountName: flannelinitContainers:- name: install-cni-pluginimage: docker.io/flannel/flannel-cni-plugin:v1.4.0-flannel1command:- cpargs:- -f- /flannel- /opt/cni/bin/flannelvolumeMounts:- name: cni-pluginmountPath: /opt/cni/bin- name: install-cniimage: docker.io/flannel/flannel:v0.24.2command:- cpargs:- -f- /etc/kube-flannel/cni-conf.json- /etc/cni/net.d/10-flannel.conflistvolumeMounts:- name: cnimountPath: /etc/cni/net.d- name: flannel-cfgmountPath: /etc/kube-flannel/containers:- name: kube-flannelimage: docker.io/flannel/flannel:v0.24.2command:- /opt/bin/flanneldargs:- --ip-masq- --kube-subnet-mgrresources:requests:cpu: "100m"memory: "50Mi"securityContext:privileged: falsecapabilities:add: ["NET_ADMIN", "NET_RAW"]env:- name: POD_NAMEvalueFrom:fieldRef:fieldPath: metadata.name- name: POD_NAMESPACEvalueFrom:fieldRef:fieldPath: metadata.namespace- name: EVENT_QUEUE_DEPTHvalue: "5000"volumeMounts:- name: runmountPath: /run/flannel- name: flannel-cfgmountPath: /etc/kube-flannel/- name: xtables-lockmountPath: /run/xtables.lockvolumes:- name: runhostPath:path: /run/flannel- name: cni-pluginhostPath:path: /opt/cni/bin- name: cnihostPath:path: /etc/cni/net.d- name: flannel-cfgconfigMap:name: kube-flannel-cfg- name: xtables-lockhostPath:path: /run/xtables.locktype: FileOrCreate
注:如上flannel的yml文件不可以直接使用,需要修改
3.4.7.2 修改一:pod网络信息,这个信息是kubeadm init初始化填写的pod网络信息
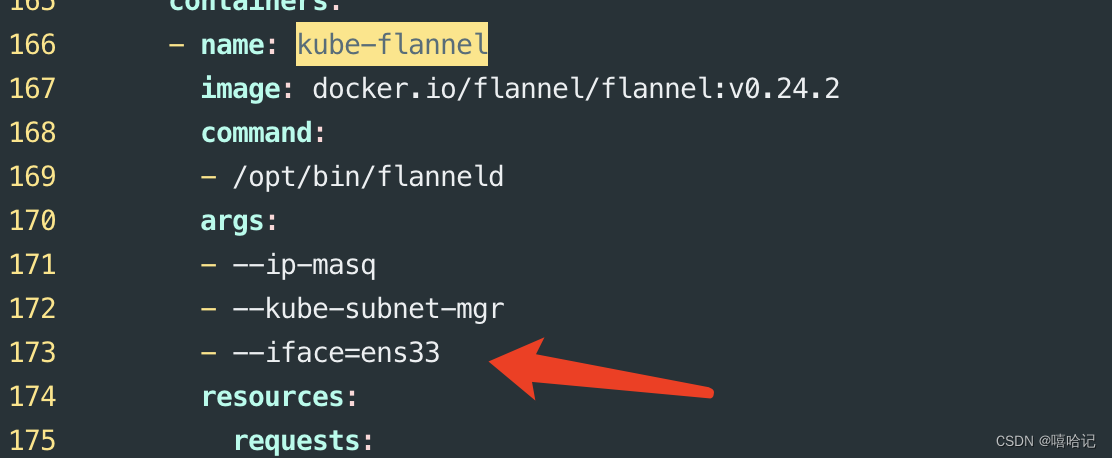
3.4.7.3 修改二:告诉flannel主机通信使用的是哪个网卡
- 跨主机的容器通信,最终不得走宿主机的物理网卡。
- 告诉flannel的你物理网卡是谁
- 添加一行args:- --iface=ens33
3.4.7.4 基于kubelet命令,应用这个yml文件,读取和创建pod资源
[root@k8s-master ~]# kubectl create -f ./kube-flannel.yml
namespace/kube-flannel created
clusterrole.rbac.authorization.k8s.io/flannel created
clusterrolebinding.rbac.authorization.k8s.io/flannel created
serviceaccount/flannel created
configmap/kube-flannel-cfg created
daemonset.apps/kube-flannel-ds created
3.4.8 至此,k8s集群搭建完成